
Congratulations on getting a new router. If you are wondering how to physically setup your new router? This guide will walk you through the steps for getting your router ready to use.
Before I start there are a few terms that need to be explained. Please be sure you understand these before you proceed.
Ethernet vs. Internet
These two words are very similar. It's easy to assume they mean the same thing. One is just spelled slightly different.
The term Ethernet refers to the data flowing from the modem to the router. This data flows through what is called an Ethernet cable and is connected to an Ethernet connector. The term Ethernet is often explained as your LAN or Local Area Network but this is not quite right. Even though most people run their LAN on an Ethernet system it doesn't mean all Ethernet systems are a LAN.
The term Internet is referring to one huge world wide network. This is called WAN or Wide Area Network by most routers. The Internet is made up of all the smaller networks connected together. There is only one Internet. The security of the Internet is much scarier than that of an . You need a firewall when accessing the Internet.
Modem vs. Router
I used to get these two terms confused. I kind of thought the tech savvy people were just trying to make me feel dumb by switching the terms on me every once and a while to see what I would do. I would grin and nod... not having any idea now what they were talking about.
A modem is what communicates with your Internet Service Provider (ISP). This is how you connect to the Internet. A modem has to use what ever style of Internet connection your ISP is providing such as DSL or cable. If your ISP is a cable provider you will be use a coax cable to connect from the wall to the modem. If your ISP is a DSL provider you will be using a telephone line to connect to the modem. The modem provides an Ethernet port in which you can attach a router.
A router does exactly what it's name denotes. It routes the Internet to all the different devices you have on your network. A router cannot access the Internet by itself unless it is a combined router/modem unit. A router needs a modem to access the Internet.
Taking a Closer Look
All routers are different in shape and size but all the details are basically the same. This guide will be using the Netgear NightHawk AC1900 as the example. You can follow along with your router, it will be very similar.
Once you have taken the router out of the packaging take a good look at it. Some routers only have one indicator and some like the Netgear NightHawk AC1900 have a lot.
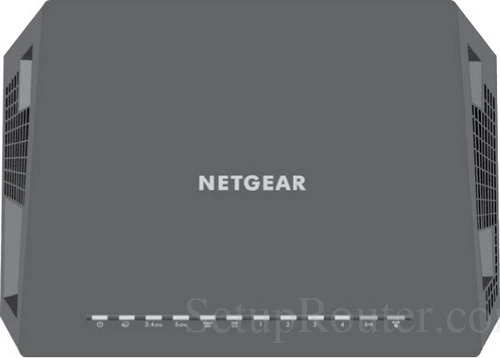
Starting on the left what are these indicators?

This is the power indicator. For this particular router it will first be a solid amber color, turning to a solid white color when the router is ready. If the light is a blinking amber it means the router is either upgrading or the reset button was pressed. If the light is a blinking white it means you have a problem, the firmware is corrupted. If the power indicator is off it means the router has no power.

The next indicator is the Internet indicator. It will also go from solid amber to solid white when it is ready to use. If it is off that means the router doesn't have the Ethernet cable connected to the modem.


Depending on which bandwidth you wireless network is transmitting on one of these indicators will be lit up. If you are using 2.4GHz bandwidth this one will be lit up. It will blink when it receives wireless traffic. Likewise if you are transmitting your wireless network on 5GHz the 5GHz indicator will be lit up and blink when you receive wireless traffic.

If you have a guest network this light will be lit up. Just like the 2.4GHz or 5GHz indicators, if it is blinking it means you are receiving traffic through your guest connection.

If this light is on it means you have a device connected with a USB cable. If this light is blinking it means the USB device is trying to connect.

These four indicators each correlate with a specific LAN port on the back of the router. If you have a device, such as a desktop computer, connected to the router with a cable the appropriate indicator on the front will be lit up. A solid color means it is connected and a blinking light means it is receiving traffic.
The color of these four LAN indicators on the front indicates the speed. The color white for these LAN ports is faster than amber.

On this router the WiFi indicator is also a button. You can turn your wireless on or off by just pressing this button for a couple seconds.

This indicator is also a button. This is if you want to connect a wireless device without entering a password. I do not recommend connecting a wireless device this way as it is not as secure as a password. You can learn more about WPS in my guide titled What is WPS.
Now that you should have a good idea of what the indicators on the front look like, let's take a look at the back panel.
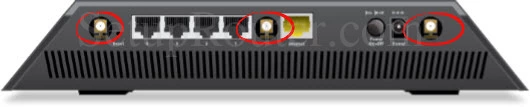
In this first image I have circled the antennas. The router you are setting up probably doesn't have three but an antenna connection will look like the ones I have circled above.
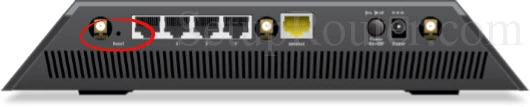
To the right of that is the reset button/pinhole. This button is only used on rare occasions. It is recessed like this to avoid accidental resets. I have a growing list of Reset Guides. Just select your router from the list and click on the reset router link.
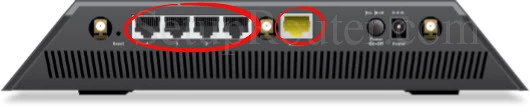
In the image above I have circled the ports for you. The four on the left are considered LAN ports. If you want to connect the router directly to a device such as a desktop computer, you would use one of these LAN ports to do so. The one by itself on the right is the WAN port. This port needs to be connected to your modem.
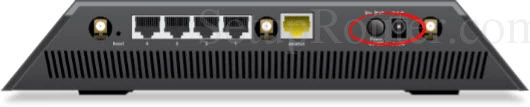
In this final image I have circled the power button and power connection. The button to the left is how you turn on and off the router. The connection to the right is where you plug in your power source.
Where to Place the Router
To get the best wireless connection possible there are some things you need to consider.
DO place your new router a central location. Centrally located, the WiFi signal has a better chance of being used anywhere within the home. Of course this placement needs to have a outlet and be within reach of any device you want to be wired to the router.
DON'T position the router near any other major electrical appliances like microwaves or home security systems. The bandwidths are very similar and can cause you to lose connectivity to your Internet if you place the router close to these type of appliances.
Let's Begin
Step One
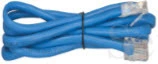
Take the Ethernet Cable that came with your router and attach it to the WAN port of your router. The other end of this Ethernet cable needs to be attached to the modem. Ethernet cables come in all different colors. So don't panic if your Ethernet cable looks different than the one above. Just make sure it is connected to the WAN port on your router. The WAN port will almost always be separated from the LAN ports.
Step Two
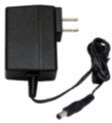
Connect the power adapter to the router in the proper power connection point on the back of the router. This connection point will be a circle with a single prong or tine in the center. Then plug the other end of the the power adapter to the wall.
Step Three
Turn the router on using the power button. The power button could be just about anywhere on the router. Simply look for a button that says power. The router I am using as an example placed it next to the power connection on the back panel.
Congratulations, your new wireless network is up and ready to connect to the Internet.
Accessing the Router Interface For the First Time
The first time you connect to the router I would recommend using a wired device. This means you need to take a different Ethernet cable and attach one end to an available Ethernet port on the back of the router. These ports might also be called the LAN ports. Place the other end of the cable in an Ethernet port on the back of your computer.
Once you have setup a wired connection to the router I highly recommend logging into the router using the default router IP address, username and password. We have this information for you. All you need to do is check out our Home page and select your router from our growing list. Then click the link that takes you to the Login guide for your router.
After you have successfully logged into your router's web interface make sure to change the default passwords. Both the router login password and the WiFi password. Here on this site we have all the guides you need to make your local network as secure as possible. Make sure to check them all out.
Now What
You might be wondering how to connect to the new network. It will be different for every wireless device.
First you need to open the software application that manages the wireless connections. Then scan for networks in your vicinity. Find the one that matches the router wireless name you just setup. After selecting the right wireless name it will ask you for the password. Simply input the password you just setup for your WiFi. You should now be connected to your local network.