This page will show you how to setup a port forward on the Cisco Linksys E2500 router.
If you are not sure what port forwarding is you can read our What is Port Forwarding guide to help get started.
Other Cisco Linksys E2500 Guides
This is the port forwarding guide for the Cisco Linksys E2500. We also have the following guides for the same router:
- Cisco Linksys E2500 - How to change the IP Address on a Cisco Linksys E2500 router
- Cisco Linksys E2500 - Cisco Linksys E2500 Login Instructions
- Cisco Linksys E2500 - Cisco Linksys E2500 User Manual
- Cisco Linksys E2500 - How to change the DNS settings on a Cisco Linksys E2500 router
- Cisco Linksys E2500 - Setup WiFi on the Cisco Linksys E2500
- Cisco Linksys E2500 - How to Reset the Cisco Linksys E2500
- Cisco Linksys E2500 - Information About the Cisco Linksys E2500 Router
- Cisco Linksys E2500 - Cisco Linksys E2500 Screenshots
Configure your Computer to Have a Static IP Address
Port forwarding the Cisco Linksys E2500 to your computer can be more reliable if you first configure a static IP address on your computer. We have instructions to setup a static IP address for Windows 7, Windows 8, and a variety of other devices on our Static IP Address Settings page.
Please note that while setting up a static IP address on your computer is optional, it is still a very good idea to go ahead and do it. In the long run it will make your port forward much more reliable.
Login To The Cisco Linksys E2500
To get started forwarding a port you need to login to your Cisco Linksys E2500 router. If you are already logged in you can skip this step.
To login to the Cisco Linksys E2500, follow our Cisco Linksys E2500 Login Guide.
Forward a Port on the Cisco Linksys E2500 router
Find The Port Forwarding Section of the Cisco Linksys E2500

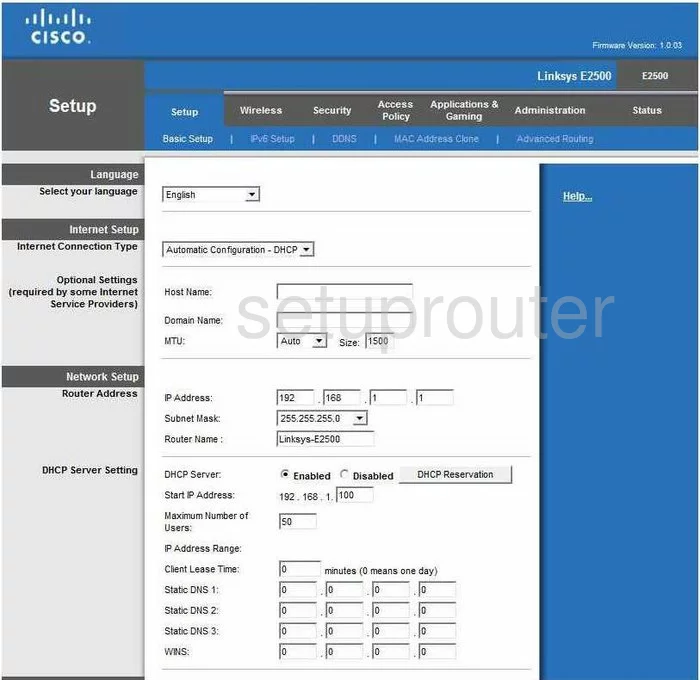
You begin on the Basic Setup page of the Cisco Linksys-E2500 router. From this page, to setup a port forward, click the option at the top of the page labeled Applications & Gaming.
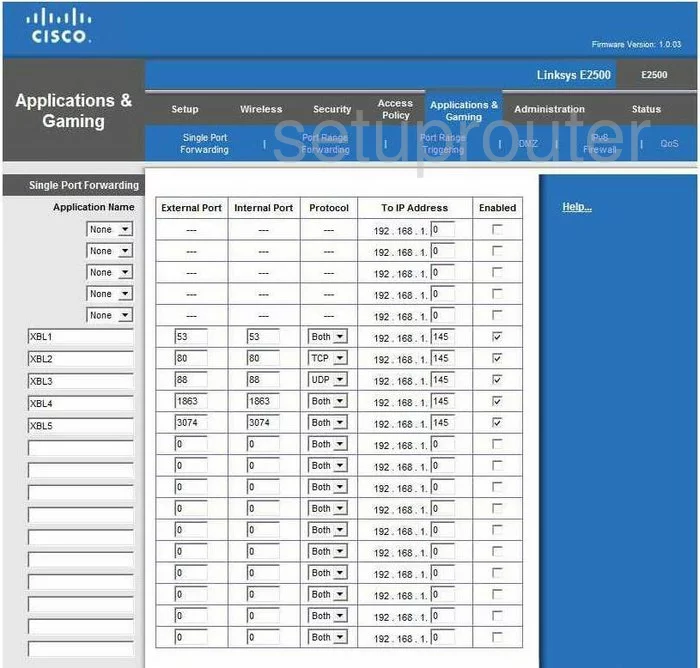
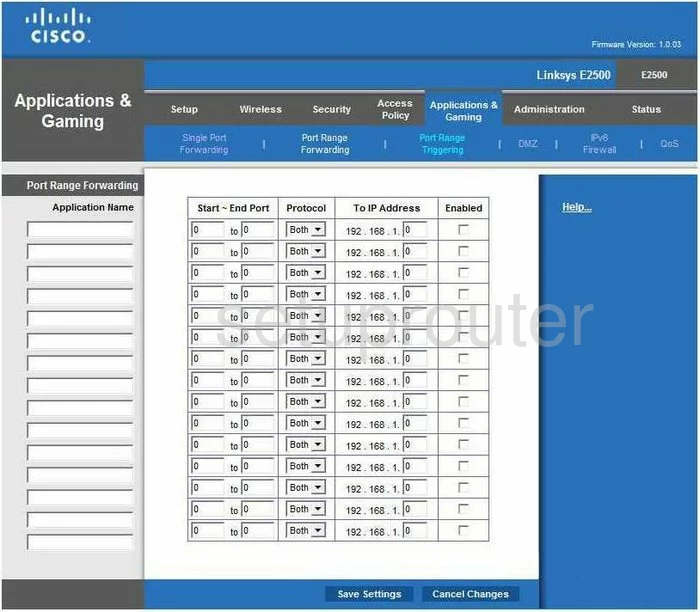
You are now given new choices in the blue bar, along the top of the page. If you want to setup a single port forward, then click Single Port Forwarding. If you want to setup a range of port forwards, click the choice of Port Range Forwarding.
Configure the Port Forwarding section of your Cisco Linksys E2500
Now to forward a port, make the following changes:

Single Port Forwarding
- Find an empty line, and enter the name of the program you are forwarding this port for in the box labeled Application Name.
- In the box labeled External Port, enter the port number you are forwarding. Enter that same number in the box labeled Internal Port.
- The Protocol drop down menu is next. Use this menu to choose the type of protocol or transport you want to use while forwarding this port.
- Next is the To IP Address box, enter the LAN IP Address of the computer you are forwarding this port to.
- Place a check-mark in the small box labeled Enabled.
- Click the Save Settings button at the bottom of the page.

Port Range Forwarding
- In the first empty row of boxes, enter the name of the program in the box titled Application Name.
- Key in the lowest number of the range of ports in the left box of Start~End Port. Enter the highest number of the range in the right box of the Start~End Port.
- Then, use the Protocol drop down menu to choose the type of forwarding you want to do.
- Next, in the To IP Address box, enter the specific LAN IP address of the computer you want to forward these ports to.
- Put a check in the box titled Enabled.
- At the bottom of the page, click Save Settings.
That's it, you're finished!
Test if Your Ports are Open
Now that you have forwarded ports on the Cisco Linksys E2500 you should test to see if your ports are forwarded correctly.
To test if your ports are forwarded you should use our Open Port Check tool.
Other Cisco Linksys E2500 Info
Don't forget about our other Cisco Linksys E2500 info that you might be interested in.
This is the port forwarding guide for the Cisco Linksys E2500. We also have the following guides for the same router:
- Cisco Linksys E2500 - How to change the IP Address on a Cisco Linksys E2500 router
- Cisco Linksys E2500 - Cisco Linksys E2500 Login Instructions
- Cisco Linksys E2500 - Cisco Linksys E2500 User Manual
- Cisco Linksys E2500 - How to change the DNS settings on a Cisco Linksys E2500 router
- Cisco Linksys E2500 - Setup WiFi on the Cisco Linksys E2500
- Cisco Linksys E2500 - How to Reset the Cisco Linksys E2500
- Cisco Linksys E2500 - Information About the Cisco Linksys E2500 Router
- Cisco Linksys E2500 - Cisco Linksys E2500 Screenshots