This page shows how to change the DNS settings on the Dlink DI-724GU router.
Other Dlink DI-724GU Guides
This is the dns guide for the Dlink DI-724GU. We also have the following guides for the same router:
- Dlink DI-724GU - How to change the IP Address on a Dlink DI-724GU router
- Dlink DI-724GU - Dlink DI-724GU Login Instructions
- Dlink DI-724GU - Dlink DI-724GU User Manual
- Dlink DI-724GU - Dlink DI-724GU Port Forwarding Instructions
- Dlink DI-724GU - Setup WiFi on the Dlink DI-724GU
- Dlink DI-724GU - How to Reset the Dlink DI-724GU
- Dlink DI-724GU - Information About the Dlink DI-724GU Router
- Dlink DI-724GU - Dlink DI-724GU Screenshots
What is the DNS setting on a Router
When you connect a router to the Internet it gets a few settings from your ISP automatically. One of the settings that the ISP sets in your router is the DNS setting. DNS stands for Domain Name System and it is used to convert Internet names into actual IP addresses. For instance, when you go to "google.com", your are really connecting to an IP address that is mapped through DNS to a number such as:
- 173.194.33.73
This mapping happens automatically every time you visit any page on the Internet.
Why Change Your Router's DNS Setting
Some ISPs choose to abuse the DNS system and map unknown names to servers that they control. This can be done in a way that you don't know it is happening since your router is getting its DNS settings from your ISP. For instance, if you have one of these ISPs who is hijacking your DNS, and you try to surf the web to "some-random-site.com" and "some-random-site.com" does not exist, you might get a page back from your ISP with local advertisements on it.
By changing your DNS setting in your router you will effectively change the DNS setting for every computer on your network. This is because when a device is connected to your network your router automatically hands out its own DNS settings to that device. This way you can protect your entire network from ISP hijacking with just one setting.
What Should I Change My DNS To
There are 2 really great DNS servers on the Internet that you can choose from right now: Google Public DNS and OpenDNS. If you are not sure which one to pick then just use Google Public DNS.
When you change the DNS settings in your router, you usually have to enter a Primary and a Secondary setting. The secondary is only used if the primary can not be located. Here are common settings:
If you want to use Google Public DNS, use the following settings:
- Primary: 8.8.8.8
- Secondary: 8.8.4.4
If you want to use OpenDNS, use the following settings:
- 208.67.222.222
- 208.67.220.220
Login To The Dlink DI-724GU
To get started configuring the Dlink DI-724GU DNS page you need to login to your router. If you are already logged in you can skip this step.
To login to the Dlink DI-724GU, follow our Dlink DI-724GU Login Guide.
Change the DNS settings on a Dlink DI-724GU
If you followed our login guide above then you should see this screen.
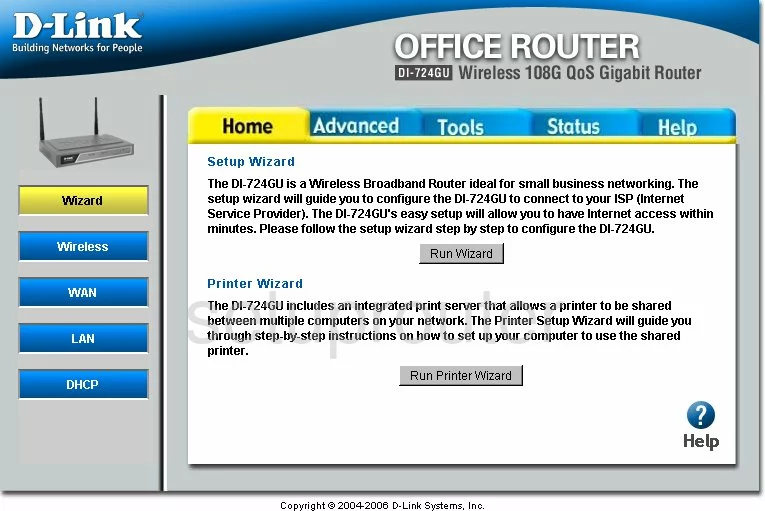
From the Home page of the Dlink DI-724GU router, click the link labeled WAN on the left side of the page.
Configure the DNS section of your Dlink DI-724GU
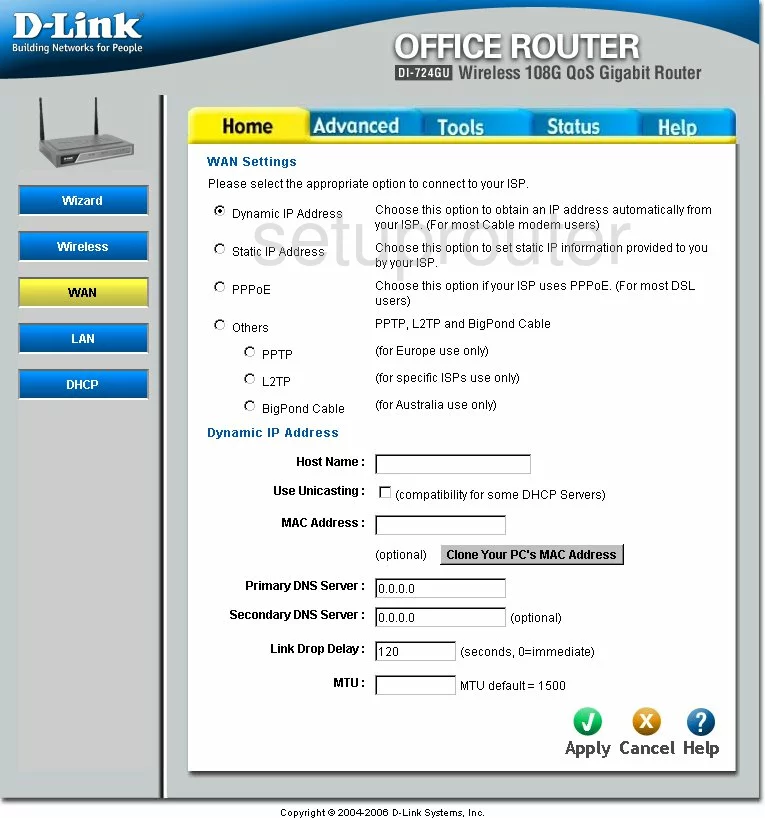
On this new page, find the box labeled Primary DNS Server and enter the primary address of the DNS Server you want to use. Below that is the Secondary DNS Server. Enter the secondary address of that same DNS Server.
That's all there is to it, click the green Apply button and you are done!
Possible Problems when Changing your DNS settings
Most devices on your network will not begin using the new DNS settings until they have been rebooted. After rebooting a device you can go to it's network settings and verify that it is using the DNS servers that you specified.
Other Dlink DI-724GU Info
Don't forget about our other Dlink DI-724GU info that you might be interested in.
This is the dns guide for the Dlink DI-724GU. We also have the following guides for the same router:
- Dlink DI-724GU - How to change the IP Address on a Dlink DI-724GU router
- Dlink DI-724GU - Dlink DI-724GU Login Instructions
- Dlink DI-724GU - Dlink DI-724GU User Manual
- Dlink DI-724GU - Dlink DI-724GU Port Forwarding Instructions
- Dlink DI-724GU - Setup WiFi on the Dlink DI-724GU
- Dlink DI-724GU - How to Reset the Dlink DI-724GU
- Dlink DI-724GU - Information About the Dlink DI-724GU Router
- Dlink DI-724GU - Dlink DI-724GU Screenshots