This page will show you how to setup a port forward on the Dlink GamerLounge DGL-4100 router.
If you are not sure what port forwarding is you can read our What is Port Forwarding guide to help get started.
Other Dlink GamerLounge DGL-4100 Guides
This is the port forwarding guide for the Dlink GamerLounge DGL-4100. We also have the following guides for the same router:
- Dlink GamerLounge DGL-4100 - How to change the IP Address on a Dlink GamerLounge DGL-4100 router
- Dlink GamerLounge DGL-4100 - Dlink GamerLounge DGL-4100 Login Instructions
- Dlink GamerLounge DGL-4100 - Dlink GamerLounge DGL-4100 User Manual
- Dlink GamerLounge DGL-4100 - How to Reset the Dlink GamerLounge DGL-4100
- Dlink GamerLounge DGL-4100 - Information About the Dlink GamerLounge DGL-4100 Router
- Dlink GamerLounge DGL-4100 - Dlink GamerLounge DGL-4100 Screenshots
Configure your Computer to Have a Static IP Address
Port forwarding the Dlink GamerLounge DGL-4100 to your computer can be more reliable if you first configure a static IP address on your computer. We have instructions to setup a static IP address for Windows 7, Windows 8, and a variety of other devices on our Static IP Address Settings page.
Please note that while setting up a static IP address on your computer is optional, it is still a very good idea to go ahead and do it. In the long run it will make your port forward much more reliable.
Login To The Dlink GamerLounge DGL-4100
To get started forwarding a port you need to login to your Dlink GamerLounge DGL-4100 router. If you are already logged in you can skip this step.
To login to the Dlink GamerLounge DGL-4100, follow our Dlink GamerLounge DGL-4100 Login Guide.
Forward a Port on the Dlink GamerLounge DGL-4100 router
Find The Port Forwarding Section of the Dlink GamerLounge DGL-4100

Starting on the Status page of the Dlink DGL-4100 router, click the choice at the top in the orange bar labeled Advanced. Then on the left, choose the option of Gaming.
Configure the Port Forwarding section of your Dlink GamerLounge DGL-4100
Now to forward a port, make the following changes:
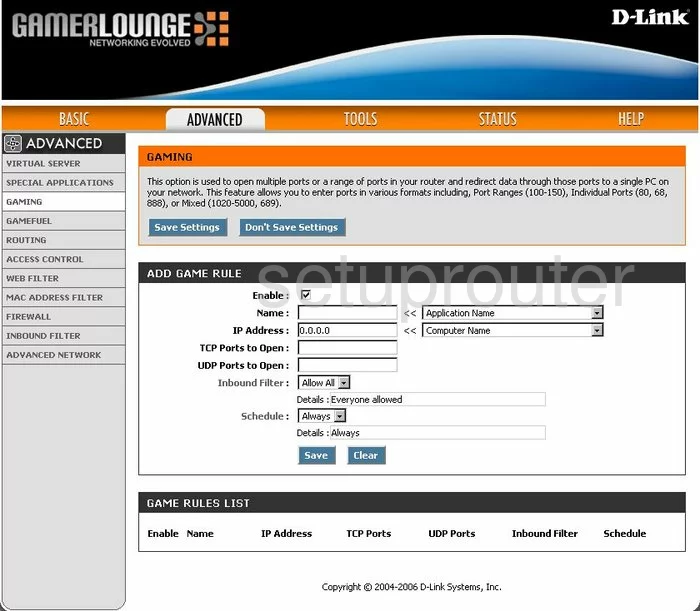
On this new page, first place a check in the box labeled Enable.
Then, below that enter the name of the program in the box titled Name. This is for your future reference, so make it something that helps you to remember why you are forwarding these ports.
Below that is the IP Address box. Enter the LAN IP address of the specific computer you are forwarding these ports to.
Next, enter the ports you want to forward in the box titled TCP Ports to Open, and also in the box titled UDP Ports to Open. You can enter these ports in a list form, 22,23,24, a range form, 80-100, or even a combo such as 22,23,24,80-100.
Then, in the Inbound Filter drop down box, choose Allow All.
Next is the drop down titled Schedule, choose Always.
Click the blue button labeled Save.
That's it, congratulations!
Test if Your Ports are Open
Now that you have forwarded ports on the Dlink GamerLounge DGL-4100 you should test to see if your ports are forwarded correctly.
To test if your ports are forwarded you should use our Open Port Check tool.
Other Dlink GamerLounge DGL-4100 Info
Don't forget about our other Dlink GamerLounge DGL-4100 info that you might be interested in.
This is the port forwarding guide for the Dlink GamerLounge DGL-4100. We also have the following guides for the same router:
- Dlink GamerLounge DGL-4100 - How to change the IP Address on a Dlink GamerLounge DGL-4100 router
- Dlink GamerLounge DGL-4100 - Dlink GamerLounge DGL-4100 Login Instructions
- Dlink GamerLounge DGL-4100 - Dlink GamerLounge DGL-4100 User Manual
- Dlink GamerLounge DGL-4100 - How to Reset the Dlink GamerLounge DGL-4100
- Dlink GamerLounge DGL-4100 - Information About the Dlink GamerLounge DGL-4100 Router
- Dlink GamerLounge DGL-4100 - Dlink GamerLounge DGL-4100 Screenshots