The Netgear CG3000 router is considered a wireless router because it offers WiFi connectivity. WiFi, or simply wireless, allows you to connect various devices to your router, such as wireless printers, smart televisions, and WiFi enabled smartphones.
Other Netgear CG3000 Guides
This is the wifi guide for the Netgear CG3000. We also have the following guides for the same router:
- Netgear CG3000 - How to change the IP Address on a Netgear CG3000 router
- Netgear CG3000 - Netgear CG3000 User Manual
- Netgear CG3000 - Netgear CG3000 Login Instructions
- Netgear CG3000 - How to change the DNS settings on a Netgear CG3000 router
- Netgear CG3000 - Information About the Netgear CG3000 Router
- Netgear CG3000 - Netgear CG3000 Screenshots
- Netgear CG3000 - Reset the Netgear CG3000
WiFi Terms
Before we get started there is a little bit of background info that you should be familiar with.
Wireless Name
Your wireless network needs to have a name to uniquely identify it from other wireless networks. If you are not sure what this means we have a guide explaining what a wireless name is that you can read for more information.
Wireless Password
An important part of securing your wireless network is choosing a strong password.
Wireless Channel
Picking a WiFi channel is not always a simple task. Be sure to read about WiFi channels before making the choice.
Encryption
You should almost definitely pick WPA2 for your networks encryption. If you are unsure, be sure to read our WEP vs WPA guide first.
Login To The Netgear CG3000
To get started configuring the Netgear CG3000 WiFi settings you need to login to your router. If you are already logged in you can skip this step.
To login to the Netgear CG3000, follow our Netgear CG3000 Login Guide.
Find the WiFi Settings on the Netgear CG3000
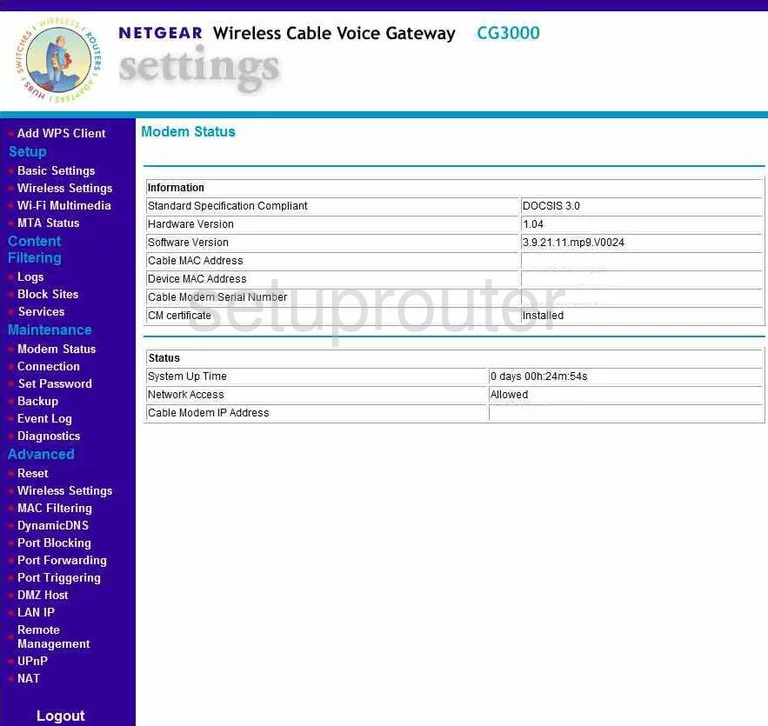
If you followed our login guide above then you should see this screen.

After you have logged into the Netgear CG3000 you begin on the Modem Status page.
Click the option in the left sidebar labeled Wireless Settings under the heading of Setup.
Change the WiFi Settings on the Netgear CG3000

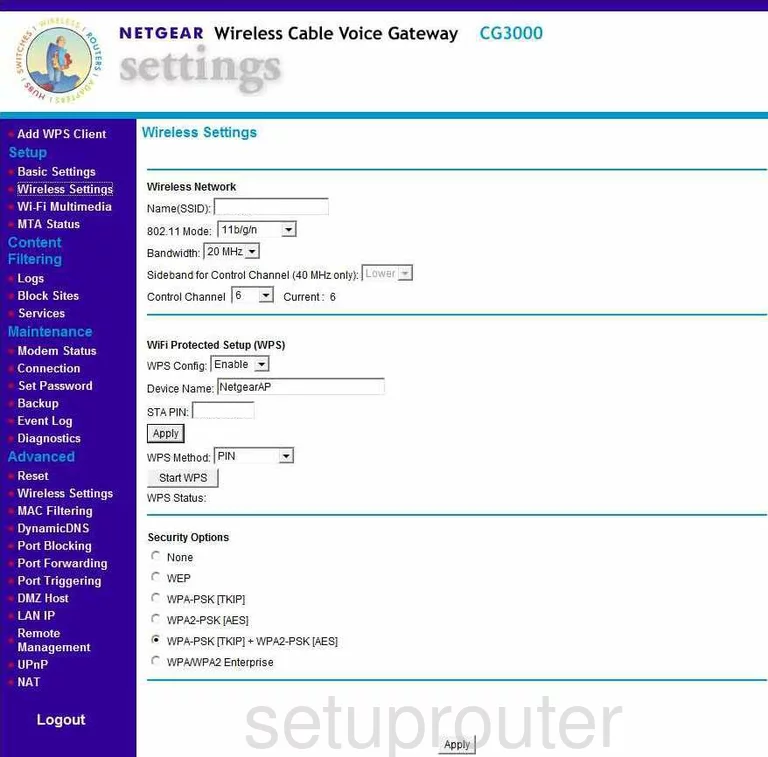
This brings you to the page you see above.
First, change the Name(SSID) to one of your creation. This name should be unique so it is easier to remember. We do recommend that you avoid personal information. Learn more in our Wireless Names Guide.
The second setting that needs to be changed is the Control Channel. Just be sure your router is using channels 1,6, or 11. Learn why these three channels are important in our WiFi Channels Guide.
The next section is titled WiFi Protected Setup(WPS). We strongly recommend that you don't use WPS. Disable this in the drop down list labeled WPS Config. For more information about WPS, read our What is WPS Guide.
Go to the next section labeled Security Options.
For the best security option click the radio button labeled WPA2-PSK[AES]. For more on this topic, read our WEP vs. WPA Guide.
You will then be asked for a WPA2-PSK[AES] Pre-Shared Key. This is the network password. Create a strong password of at least 14-20 characters. Learn more in our Choosing a Strong Password Guide.
That's it, just click the Apply button near the bottom of the page before you exit.
Possible Problems when Changing your WiFi Settings
After making these changes to your router you will almost definitely have to reconnect any previously connected devices. This is usually done at the device itself and not at your computer.
Other Netgear CG3000 Info
Don't forget about our other Netgear CG3000 info that you might be interested in.
This is the wifi guide for the Netgear CG3000. We also have the following guides for the same router:
- Netgear CG3000 - How to change the IP Address on a Netgear CG3000 router
- Netgear CG3000 - Netgear CG3000 User Manual
- Netgear CG3000 - Netgear CG3000 Login Instructions
- Netgear CG3000 - How to change the DNS settings on a Netgear CG3000 router
- Netgear CG3000 - Information About the Netgear CG3000 Router
- Netgear CG3000 - Netgear CG3000 Screenshots
- Netgear CG3000 - Reset the Netgear CG3000