This page shows how to change the LAN IP Address on the Prolink Hurricane 9000G router.
Other Prolink Hurricane 9000G Guides
This is the ip address guide for the Prolink Hurricane 9000G. We also have the following guides for the same router:
- Prolink Hurricane 9000G - Prolink Hurricane 9000G User Manual
- Prolink Hurricane 9000G - Prolink Hurricane 9000G Login Instructions
- Prolink Hurricane 9000G - How to change the DNS settings on a Prolink Hurricane 9000G router
- Prolink Hurricane 9000G - Setup WiFi on the Prolink Hurricane 9000G
- Prolink Hurricane 9000G - Information About the Prolink Hurricane 9000G Router
- Prolink Hurricane 9000G - Prolink Hurricane 9000G Screenshots
- Prolink Hurricane 9000G - Reset the Prolink Hurricane 9000G
What is the LAN IP Address of a Router
The LAN IP Address of a router is also known as its internal IP address. It is also the IP address that you connect to when you want to configure your router. It is only useful from inside your network and has no use from the Internet side.
Routers have 2 IP addresses: an internal ip address and an external ip address. The external IP address is assigned to you by your Internet Service Provider, or ISP, and is generally not something that you can change. The internal IP address is set to a default value at the factory but can be changed if you want.
Common internal IP addresses for routers are:
- 192.168.0.1
- 192.168.1.1
- 10.0.0.1
It is generally a good idea to make the last number of your router's internal IP address a '1', as in 192.168.0.1 or 10.0.0.1. This is not necessary, but many people do it and it makes it a bit easier to remember which IP address is assigned to your router. If you want to change the internal IP address of your router, this guide shows you how.
Login To The Prolink Hurricane 9000G
To get started configuring the Prolink Hurricane 9000G LAN page you need to login to your router. If you are already logged in you can skip this step.
To login to the Prolink Hurricane 9000G, follow our Prolink Hurricane 9000G Login Guide.
Change the LAN IP Address on a Prolink Hurricane 9000G
If you followed our login guide above then you should see this screen.
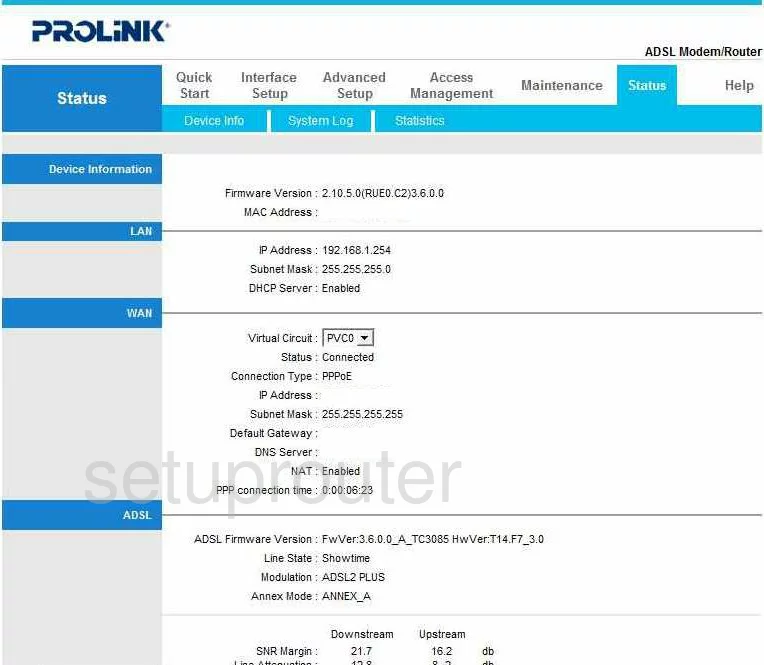
Now that you have decided to change your IP Address, the address you can see from inside your local network, first you must log into the Prolink Hurricane 9000G. This takes you to the Status page of your Router. Next, click the choice at the top labeled Interface Setup. Under this is a blue bar, click the one that says LAN.
Configure the LAN section of your Prolink Hurricane 9000G
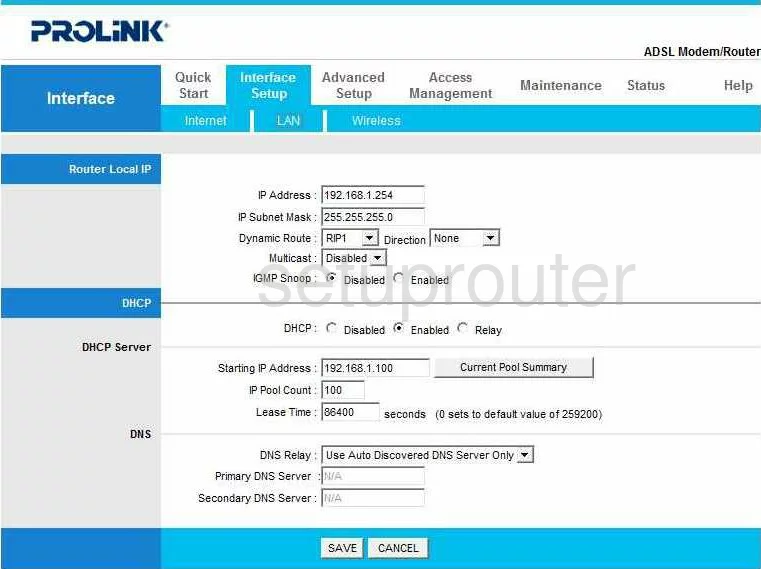
You should now be on the LAN Interface page. Place your cursor in the box marked IP Address, it should be the very first box. Enter your new address you have chosen for your Router in this box. The address you see in this screenshot is a good choice, another one would be 192.168.1.1
Now that you have made this change to your Prolink Router, make sure you left the IP Subnet Mask at 255.255.255.0
Once you have finished making all the changes you needed to, click Save.
Possible Problems when Changing your LAN IP Address
When you change your LAN IP Address you are making a fundamental change to how your network functions and all computers on your network will be affected. You will lose your Internet connection when you apply these changes. Your router may reboot and require a couple of minutes to start responding again.
Also note that some computers may need to be rebooted after you make this change before they can talk to the router or on the Internet again.
Other Prolink Hurricane 9000G Info
Don't forget about our other Prolink Hurricane 9000G info that you might be interested in.
This is the ip address guide for the Prolink Hurricane 9000G. We also have the following guides for the same router:
- Prolink Hurricane 9000G - Prolink Hurricane 9000G User Manual
- Prolink Hurricane 9000G - Prolink Hurricane 9000G Login Instructions
- Prolink Hurricane 9000G - How to change the DNS settings on a Prolink Hurricane 9000G router
- Prolink Hurricane 9000G - Setup WiFi on the Prolink Hurricane 9000G
- Prolink Hurricane 9000G - Information About the Prolink Hurricane 9000G Router
- Prolink Hurricane 9000G - Prolink Hurricane 9000G Screenshots
- Prolink Hurricane 9000G - Reset the Prolink Hurricane 9000G