The Sitecom WL-303 router is considered a wireless router because it offers WiFi connectivity. WiFi, or simply wireless, allows you to connect various devices to your router, such as wireless printers, smart televisions, and WiFi enabled smartphones.
Other Sitecom WL-303 Guides
This is the wifi guide for the Sitecom WL-303. We also have the following guides for the same router:
- Sitecom WL-303 - How to change the IP Address on a Sitecom WL-303 router
- Sitecom WL-303 - Sitecom WL-303 User Manual
- Sitecom WL-303 - Sitecom WL-303 Login Instructions
- Sitecom WL-303 - Information About the Sitecom WL-303 Router
- Sitecom WL-303 - Sitecom WL-303 Screenshots
- Sitecom WL-303 - Reset the Sitecom WL-303
WiFi Terms
Before we get started there is a little bit of background info that you should be familiar with.
Wireless Name
Your wireless network needs to have a name to uniquely identify it from other wireless networks. If you are not sure what this means we have a guide explaining what a wireless name is that you can read for more information.
Wireless Password
An important part of securing your wireless network is choosing a strong password.
Wireless Channel
Picking a WiFi channel is not always a simple task. Be sure to read about WiFi channels before making the choice.
Encryption
You should almost definitely pick WPA2 for your networks encryption. If you are unsure, be sure to read our WEP vs WPA guide first.
Login To The Sitecom WL-303
To get started configuring the Sitecom WL-303 WiFi settings you need to login to your router. If you are already logged in you can skip this step.
To login to the Sitecom WL-303, follow our Sitecom WL-303 Login Guide.
Find the WiFi Settings on the Sitecom WL-303
If you followed our login guide above then you should see this screen.
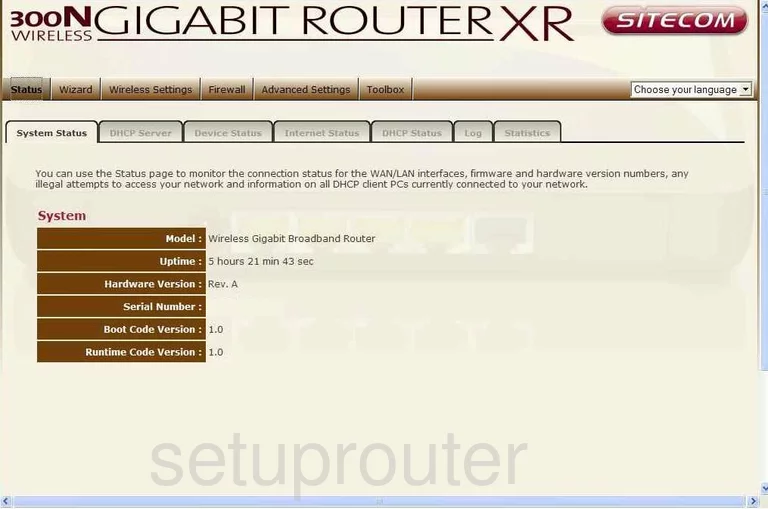
This wireless setup guide begins on the System Status page of the Sitecom WL-303. Click the option at the top labeled Wireless Settings. Then below that choose Basic.
Change the WiFi Settings on the Sitecom WL-303
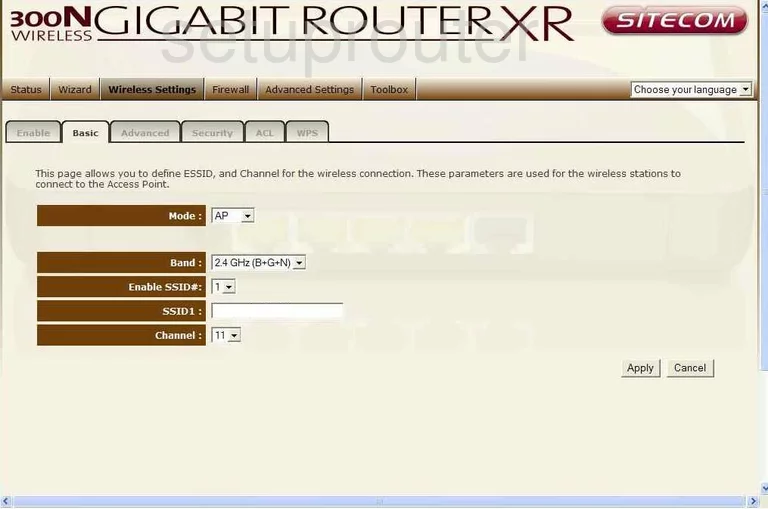
- On this page, find the SSID1 and enter a new name for your network. This name can be anything you like, but we recommend avoiding personal information. For more on this subject, check out our Wireless Name guide.
- Just under that is the Channel. Use channels 1,6, or 11 for the best wireless reception. Learn why in our WiFi Channels Guide.
- Click the Apply button.
- Now click the tab titled Security.

- First, use the Encryption drop down list to choose WPA pre-shared key. This is the security type you will use for your network.
- Below that you need to choose the WPA Type. The best and most secure choice is WPA2(AES). Learn all about WPA2 in our guide titled WEP vs. WPA.
- Set the Pre-shared Key Type to Passphrase.
- The last setting that needs to be set is the Pre-shared Key. This is the password you use to access your network. It's a good idea to make this password strong. We recommend at least 14 characters. Another way to strengthen a password is to include symbols, numbers, and capital letters. Learn more in our Password Guide.
- When you are finished, click the Apply button.
Possible Problems when Changing your WiFi Settings
After making these changes to your router you will almost definitely have to reconnect any previously connected devices. This is usually done at the device itself and not at your computer.
Other Sitecom WL-303 Info
Don't forget about our other Sitecom WL-303 info that you might be interested in.
This is the wifi guide for the Sitecom WL-303. We also have the following guides for the same router:
- Sitecom WL-303 - How to change the IP Address on a Sitecom WL-303 router
- Sitecom WL-303 - Sitecom WL-303 User Manual
- Sitecom WL-303 - Sitecom WL-303 Login Instructions
- Sitecom WL-303 - Information About the Sitecom WL-303 Router
- Sitecom WL-303 - Sitecom WL-303 Screenshots
- Sitecom WL-303 - Reset the Sitecom WL-303