This page will show you how to setup a port forward on the Buffalo WZR-1750DHP router.
If you are not sure what port forwarding is you can read our What is Port Forwarding guide to help get started.
Other Buffalo WZR-1750DHP Guides
This is the port forwarding guide for the Buffalo WZR-1750DHP. We also have the following guides for the same router:
- Buffalo WZR-1750DHP - How to change the IP Address on a Buffalo WZR-1750DHP router
- Buffalo WZR-1750DHP - Buffalo WZR-1750DHP Login Instructions
- Buffalo WZR-1750DHP - Buffalo WZR-1750DHP User Manual
- Buffalo WZR-1750DHP - How to change the DNS settings on a Buffalo WZR-1750DHP router
- Buffalo WZR-1750DHP - Setup WiFi on the Buffalo WZR-1750DHP
- Buffalo WZR-1750DHP - How to Reset the Buffalo WZR-1750DHP
- Buffalo WZR-1750DHP - Buffalo WZR-1750DHP Screenshots
- Buffalo WZR-1750DHP - Information About the Buffalo WZR-1750DHP Router
Configure your Computer to Have a Static IP Address
Port forwarding the Buffalo WZR-1750DHP to your computer can be more reliable if you first configure a static IP address on your computer. We have instructions to setup a static IP address for Windows 7, Windows 8, and a variety of other devices on our Static IP Address Settings page.
Please note that while setting up a static IP address on your computer is optional, it is still a very good idea to go ahead and do it. In the long run it will make your port forward much more reliable.
Login To The Buffalo WZR-1750DHP
To get started forwarding a port you need to login to your Buffalo WZR-1750DHP router. If you are already logged in you can skip this step.
To login to the Buffalo WZR-1750DHP, follow our Buffalo WZR-1750DHP Login Guide.
Forward a Port on the Buffalo WZR-1750DHP router
Find The Port Forwarding Section of the Buffalo WZR-1750DHP
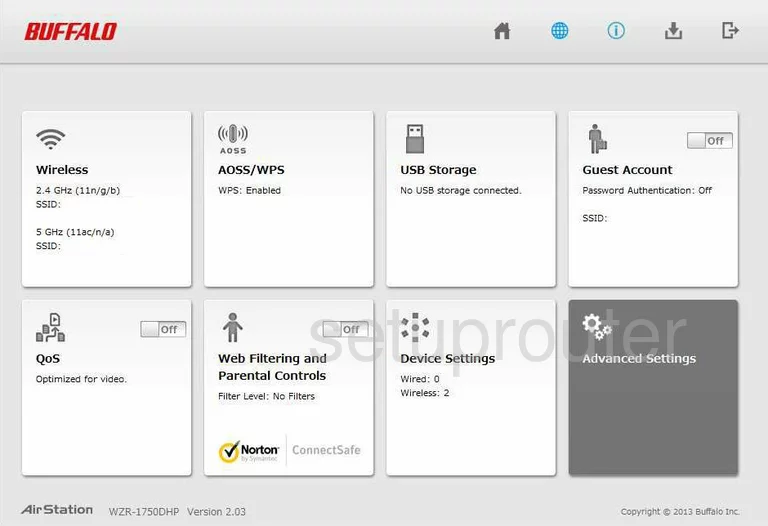
This guide begins on the Home page of the Buffalo WZR-1750DHP. Click the choice in the second row, on the right, labeled Advanced Settings.
A new page appears at this point, with some choices in the left sidebar. Pick the one labeled Security, then Port Forwarding.
Configure the Port Forwarding section of your Buffalo WZR-1750DHP
Now to forward a port, make the following changes:
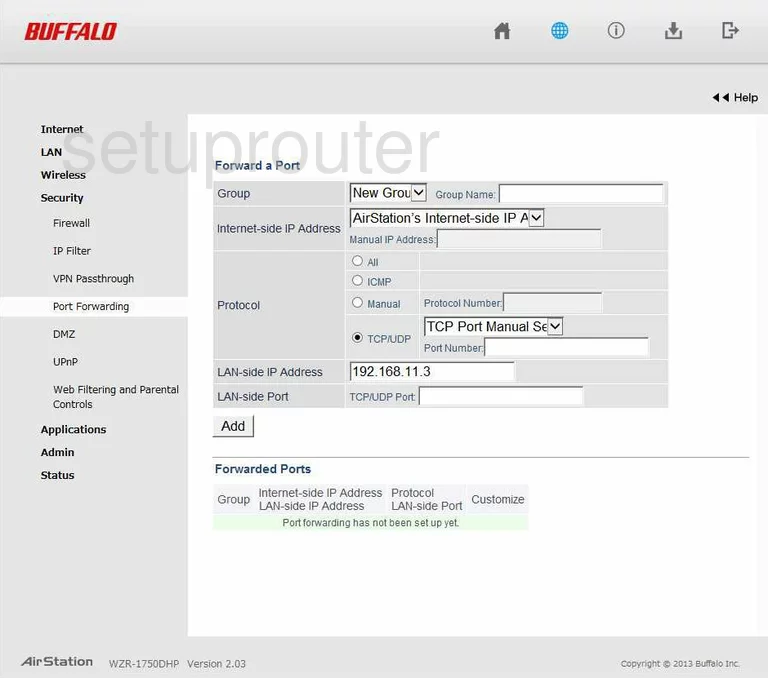
On this new page, do the following to forward a port:
- Choose New Group from the Group drop down menu.
- Enter the program name or something else that helps you remember why you are forwarding this port in the box labeled Group Name. This is for your reference only.
- In the Internet-side IP Address drop down menu, choose the option of AirStation's Internet-side IP Address.
- Next is the Protocol section. Tick the radio button labeled TCP/UDP.
- Then, use the drop down menu to choose the type of protocol you want to use while forwarding this port.
- Now, enter the port number in the box labeled Port Number. Enter that same number in the box labeled TCP/UDP Port, in the LAN-side Port section.
- Enter the LAN IP address of the computer or device you are forwarding these ports to in the box labeled LAN-side IP Address.
- Click the Add button to enable this application.
That's it, you are finished!
Test if Your Ports are Open
Now that you have forwarded ports on the Buffalo WZR-1750DHP you should test to see if your ports are forwarded correctly.
To test if your ports are forwarded you should use our Open Port Check tool.
Other Buffalo WZR-1750DHP Info
Don't forget about our other Buffalo WZR-1750DHP info that you might be interested in.
This is the port forwarding guide for the Buffalo WZR-1750DHP. We also have the following guides for the same router:
- Buffalo WZR-1750DHP - How to change the IP Address on a Buffalo WZR-1750DHP router
- Buffalo WZR-1750DHP - Buffalo WZR-1750DHP Login Instructions
- Buffalo WZR-1750DHP - Buffalo WZR-1750DHP User Manual
- Buffalo WZR-1750DHP - How to change the DNS settings on a Buffalo WZR-1750DHP router
- Buffalo WZR-1750DHP - Setup WiFi on the Buffalo WZR-1750DHP
- Buffalo WZR-1750DHP - How to Reset the Buffalo WZR-1750DHP
- Buffalo WZR-1750DHP - Buffalo WZR-1750DHP Screenshots
- Buffalo WZR-1750DHP - Information About the Buffalo WZR-1750DHP Router