This page will show you how to setup a port forward on the Dlink DIR-130 router.
If you are not sure what port forwarding is you can read our What is Port Forwarding guide to help get started.
Other Dlink DIR-130 Guides
This is the port forwarding guide for the Dlink DIR-130. We also have the following guides for the same router:
- Dlink DIR-130 - How to change the IP Address on a Dlink DIR-130 router
- Dlink DIR-130 - Dlink DIR-130 Login Instructions
- Dlink DIR-130 - Dlink DIR-130 User Manual
- Dlink DIR-130 - How to Reset the Dlink DIR-130
- Dlink DIR-130 - Information About the Dlink DIR-130 Router
- Dlink DIR-130 - Dlink DIR-130 Screenshots
Configure your Computer to Have a Static IP Address
Port forwarding the Dlink DIR-130 to your computer can be more reliable if you first configure a static IP address on your computer. We have instructions to setup a static IP address for Windows 7, Windows 8, and a variety of other devices on our Static IP Address Settings page.
Please note that while setting up a static IP address on your computer is optional, it is still a very good idea to go ahead and do it. In the long run it will make your port forward much more reliable.
Login To The Dlink DIR-130
To get started forwarding a port you need to login to your Dlink DIR-130 router. If you are already logged in you can skip this step.
To login to the Dlink DIR-130, follow our Dlink DIR-130 Login Guide.
Forward a Port on the Dlink DIR-130 router
Find The Port Forwarding Section of the Dlink DIR-130
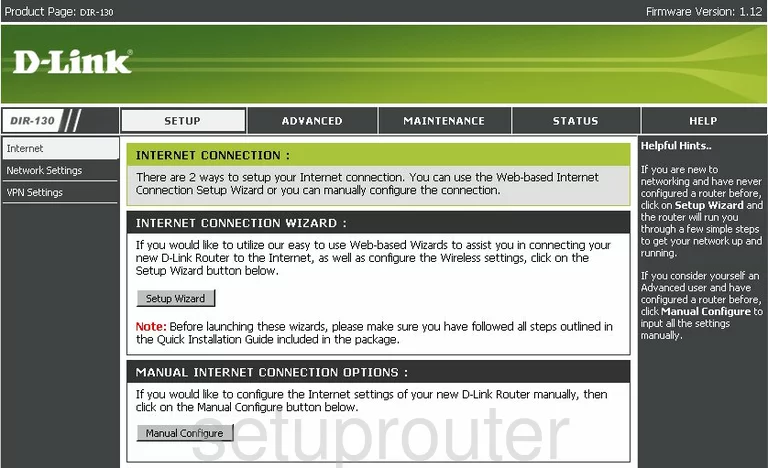
When you start on the Setup page of the Dlink DIR-130 router, click the option near the top of the page labeled ADVANCED. This creates a new list of choices on the left side of the page, in the sidebar. Pick Port Forwarding from these choices.
Configure the Port Forwarding section of your Dlink DIR-130
Now to forward a port, make the following changes:
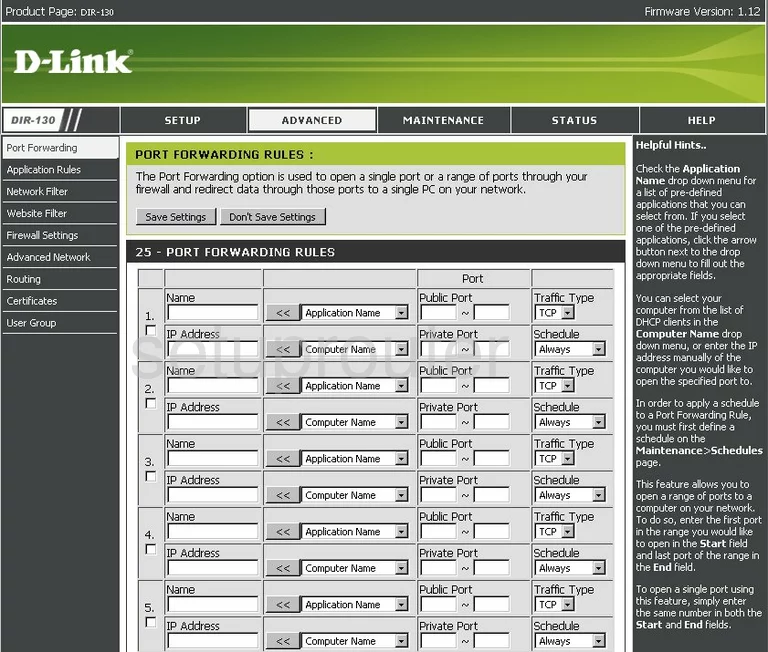
First, find an empty row of boxes, and put a check mark in the small box on the far left. Checking this box, enables the port forward you are about to create.
Moving to the right, enter the name of the program you are forwarding these ports for in the Name box.
Below that is the IP Address. Each computer in your local network has it's own internal IP address, you need to enter the internal IP address of the specific computer you are forwarding these ports to. What is my IP Address is a great guide on how to find your computer's internal IP address.
Skip the middle two drop down boxes and place your cursor in the left box of the Public Port. If you are forwarding a single port, enter this number in the left and right Public Port boxes, each box should read the same. Enter that same number in both the Public Port boxes also.
To forward a range of ports, enter the lowest number of the range in the left Private Port and Public Port boxes. Enter the highest number of the range in the right Private Port, and Public Port boxes.
The last thing you need to enter in the row is the Traffic Type. Use the available drop-down menu to choose the type of transport or protocol you have to use to forward these ports.
That's it, the only thing left to do is click the Save Settings button near the top of the page.
Test if Your Ports are Open
Now that you have forwarded ports on the Dlink DIR-130 you should test to see if your ports are forwarded correctly.
To test if your ports are forwarded you should use our Open Port Check tool.
Other Dlink DIR-130 Info
Don't forget about our other Dlink DIR-130 info that you might be interested in.
This is the port forwarding guide for the Dlink DIR-130. We also have the following guides for the same router:
- Dlink DIR-130 - How to change the IP Address on a Dlink DIR-130 router
- Dlink DIR-130 - Dlink DIR-130 Login Instructions
- Dlink DIR-130 - Dlink DIR-130 User Manual
- Dlink DIR-130 - How to Reset the Dlink DIR-130
- Dlink DIR-130 - Information About the Dlink DIR-130 Router
- Dlink DIR-130 - Dlink DIR-130 Screenshots