On this page I will be showing you how to correctly reset the Dlink DNS-343-2TB back to it's original factory defaults. This is not the same thing as a reboot. A reboot simply cycles the power to the device. A reset takes all the settings and erases them and replaces them with the original factory defaults.
Warning: This reset is a big step and should not be taken lightly. It is recommended that you create a list of settings that you have changed during the lifetime of the unit. Consider the following:
- The unit's main username and password are erased and reverted back to factory defaults.
- If you have made any other setting changes inside the interface they are erased. Write all of these changes you have made down so you can reconfigure them later.
Other Dlink DNS-343-2TB Guides
This is the reset router guide for the Dlink DNS-343-2TB. We also have the following guides for the same router:
- Dlink DNS-343-2TB - How to change the IP Address on a Dlink DNS-343-2TB router
- Dlink DNS-343-2TB - Dlink DNS-343-2TB Login Instructions
- Dlink DNS-343-2TB - Dlink DNS-343-2TB User Manual
- Dlink DNS-343-2TB - How to change the DNS settings on a Dlink DNS-343-2TB router
- Dlink DNS-343-2TB - Dlink DNS-343-2TB Screenshots
- Dlink DNS-343-2TB - Information About the Dlink DNS-343-2TB Router
Reset the Dlink DNS-343-2TB
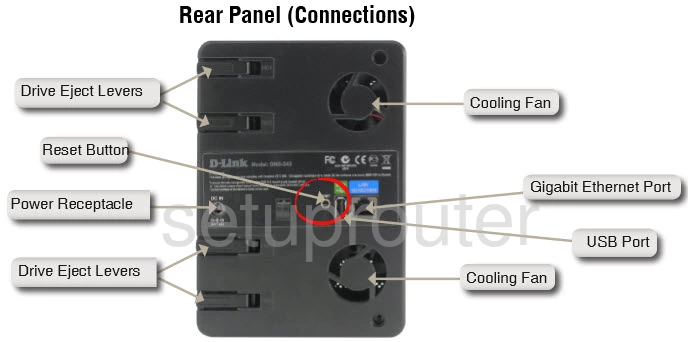
The first step is to find the reset button on the back panel of the unit. For the Dlink DNS-343-2TB I have circled it's location for you in the image below.

Take a straightened paperclip and press down on the reset button for over 5 seconds. This begins the reset process which takes upwards of a minute or more.
Don't forget this will erase every setting you have ever made to this device. Try and avoid this by exhausting your other troubleshooting methods first.
Login to the Dlink DNS-343-2TB
Now that you've successfully reset your Dlink DNS-343-2TB you'll need to log into it. Do this by using the factory default username and password. Not sure where to find these? We have them provided for you in our Login Guide.
Tip: If the defaults aren't logging you in it could be because the reset button wasn't held down for long enough.
Change Your Password
Next we recommend setting a new password for your device. This can be anything you want it to be, however keep in mind that a strong password includes no personal information and is 14-20 characters in length. For more help be sure to check out our Choosing a Strong Password Guide.
Tip: Prevent yourself from losing your new password by writing it on a note and taping it to the bottom of your unit.
Dlink DNS-343-2TB Help
Be sure to check out our other Dlink DNS-343-2TB info that you might be interested in.
This is the reset router guide for the Dlink DNS-343-2TB. We also have the following guides for the same router:
- Dlink DNS-343-2TB - How to change the IP Address on a Dlink DNS-343-2TB router
- Dlink DNS-343-2TB - Dlink DNS-343-2TB Login Instructions
- Dlink DNS-343-2TB - Dlink DNS-343-2TB User Manual
- Dlink DNS-343-2TB - How to change the DNS settings on a Dlink DNS-343-2TB router
- Dlink DNS-343-2TB - Dlink DNS-343-2TB Screenshots
- Dlink DNS-343-2TB - Information About the Dlink DNS-343-2TB Router